Showing posts with label baking. Show all posts

Sunday, January 18, 2015

Vegetarian mug chocolate cake - 3rd try

- zaty.

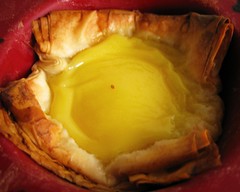
This is a modified version of the mug choc cake I tried a few years ago (ori recipe here; my 1st, 2nd attempts). I like experimenting... and i like how this turned out, especially if I'm in dire need of a quick chocolatey treat. The result? Half a mug of choc cake -- just enough to satiate those sudden pangs of sweet goodness.


Equipment 
  • A microwable mug/bowl
  • A tablespoon
  • A microwave 


Ingredients
  • 4 Tb flour
  • 1 Tb white sugar
  • 1 Tb unsweetened cocoa powder 
  • 1 Tb nutella
  • 1 tsp peanut butter (might use more pb next time)
  • 3 Tb water
  • 3 Tb coconut oil
  • 1 Tb vanilla essence


Directions  
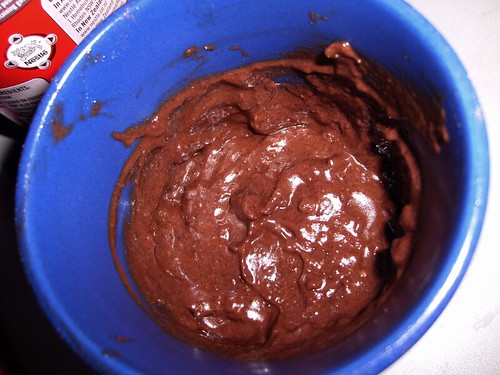
  1. Combine dry ingredients (flour, sugar, cocoa) in the mug/bowl.
  2. Add wet ingredients (nutella, peanut butter, water, oil, flavoring), mix well
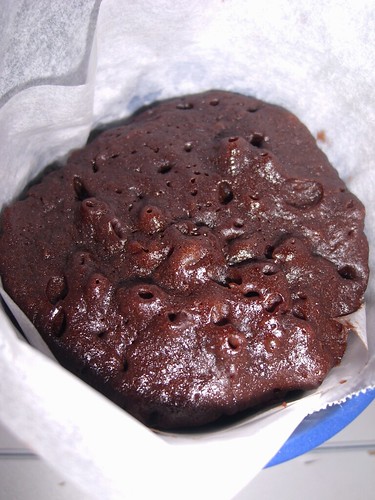
  3. Place mug in microwave; nuke for 2mins 30secs in a 1000w microwave oven
  4. Take it out of the microwave, let it settle for a few moments, and dig in!

Best eaten fresh out of the microwave when it's still soft and gooey; if you leave it for a while the cake might harden (it's not that bad, it just gets a bit a bit chunky/flaky after that, and I prefer my cakes soft).

You can also sprinkle some icing sugar at the top or have this with vanilla ice cream if you like, because i've reduced the sugar for this version because of the additions (e.g. choc chips/nutella) :)

Enjoy ^___^

Tuesday, December 23, 2014

Chewy apricot banana muesli cookies

- Zaty.

The first and only time I had apricot cookies was many years ago, in NZ (a classmate offered it to me). She said it was vegetarian, which intrigued me, because I thought most baking required eggs. She said eggs can be substituted with bananas for many sweet desserts. Many years later (i.e. now) I have decided to experiment!

I used this as my base recipe. The tweaked recipe (below) has some changes and additions because I didn't have some ingredients and I felt like adding banana and rose flavoring which I had lying around, hihi.


This makes about 40 chewy 2-inch-sized cookies:

Ingredients
  1. 1 cup brown sugar
  2. 3/4 cup margarine, softened (I used 1/2 cup butter, 1/4 cup coconut oil)
  3. 1 medium-sized banana, mashed
  4. 2 tsp vanilla flavoring
  5. 1 tsp rose flavoring
  6. 1 Tbsp water
  7. 1/2 cups muesli with raisins
  8. 3/4 cup white flour
  9. 1 tsp baking soda
  10. 1/4 tsp salt
  11. 1 cup dried apricot, finely chopped
Steps

  1. Preheat oven to 180degC. 
  2. In a large mixing bowl, combine sugar, margarine, banana, flavorings and water. Mix.
  3. Add the rest of the ingredients into the bowl. Mix.
  4. Scoop dough by rounded tablespoons and push with another spoon onto a baking tray lined with baking paper - about 2 inches between them. While waiting in between, place the mixing bowl in the fridge - this will make the cookies slightly crunchier.
  5. Bake for about 8-9 minutes per batch.
  6. After taken out of the oven, place cookies to cool on a tray. They'll be good to munch after a few minutes.

I've offered them to a number of people - my landlady, her hubby, my neighbor, my SO and his sibs... they all love it. I'm very happy with how these turned out :)

Thursday, June 12, 2014

Filosirapture (vegetarian filo wraps)

so today i decided to play with filo because i haven't done any baking in a while.

first things first - what do i have in the pantry/fridge?

scanned and spotted:
a few just-ripe avocado, coconut oil, soy milk, cheese, choc chips, cherry tomatoes, fried garlic, mushroom stock, spices+herbs.
(there were other things obviously, but i decided not to use them because they would require defrosting etc.)

so i decided to make (various kinds of) avocado filo wraps. using filo straight from the freezer*. i made different batches - about 3 wraps per combo, eg. avocado+cheese, avocado+choc chips.
preparation time for ingredients: + 5 mins?
cooking time: at Gas 6, in the oven for 12 mins per batch
overall, it took me about an hour to prepare the things for and make these:

defo not the prettiest dish in the world, lol.
also - sweet sour chilli sauce ftw!

i'm not even going to try to explain how i made this hahaha. it's not a horrible experiment (by my standards), but i know i can do better if i was more prepared and didn't feel too rushed (people were coming over so i didn't want them to witness my potential culinary disaster lol).

i'll defo try this again in the near future, but with a few things in mind:
  1. * don't use filo straight from the freezer. leave it in the fridge for a few hours to soften it a bit or else it'll get brittle and too flaky. not fun to clean up later.
  2. if you want to use milk to 'moisten' the filo up a bit, leave it to the stage just right before it's going to be chucked into the oven.
  3. filo is terribly plain, and so is avocado. definitely need to spice/herb it up a bit, or else you'll have to eat it with some kind of sauce at the end (which isn't too bad tbh, i eat my savory ones with sweet sour chilli sauce :D).
  4. use fresh garlic next time
  5. possible different ingredients to try in the future: mushrooms, capsicum, onions, leek, tuna, mince, tomato paste, oregano, chilli, oatmeal
  6. what i found were good combos in filo
    1. avocado+cheese+cumin
    2. avocado+cheese+tomato
    3. avocado+choc chips+soy milk+cinnamon powder
... yeah.

Monday, May 12, 2014

Vegan-friendly 5-minute choc cake in a mug

- zaty.


This is a modified version of the mug choc cake I tried a few years ago; this cake is less of a mess to make, uses basic ingredients, is vegan-friendy, and better for those on a diet (fewer calories, less sugar, less fat, smaller portion)! Basically, I omited the egg, substituted the milk with water, and changed the portions of some of the ingredients of the original recipe.

So I've done this a few of times in the past few months, and I like how it turns out, especially if I'm in dire need of a quick chocolatey treat. The result? Half a mug of choc cake -- just enough to satiate those sudden pangs of sweet goodness.

Equipment 
  1. A normal-sized mug
  2. A tablespoon
  3. A microwave 

Ingredients
  1. 4 Tb flour
  2. 1 Tb white sugar
  3. 1 Tb unsweetened cocoa powder 
  4. 3 Tb choc chips
  5. 3 Tb water *
  6. 3 Tb oil **
  7. Some flavoring:
    1. if using liquid eg. vanilla, peppermint essence, 1Tb
    2. if using powder form eg. cinnamon, 1tsp plus 1Tb water
sometimes I add 1 Tb oatmeal powder to give the cake some texture
**  sometimes I mix coconut oil, butter, and/or vegetable oil
Directions  
  1. Place dry ingredients (flour, sugar, cocoa, choc chips) into the mug, mix well.
  2. Add wet ingredients (water, oil, flavoring), mix until well-combined. This might take about a minute.
  3. Place mug in microwave; nuke for 2mins 50sec in a 1000w microwave oven (or 4 mins for 700w). 
  4. Take it out of the microwave, let it settle for a few moments, and dig in!
Best eaten fresh out of the oven when it's still soft and gooey; if you leave it for a while the cake might harden (it's not that bad, it just gets a bit a bit chunky/flaky after that, and I prefer my cakes soft).

You can also sprinkle some icing sugar at the top or have this with vanilla ice cream if you like :)

Enjoy ^___^

Sunday, January 01, 2012

Awesome Chocolate Chip Cookies

- zaty.

So far I've tried a number of choc chip cookies -- crunchy, chewy, big, hard, soft, a mixture of either or all of these etc -- and I think I like the crunchy on the outside but slightly chewy on the inside kinda type. I found an awesome recipe for choc chip cookies on popularcookierecipes.com which I like to use as a rough guide to make these cookies, because I've only made them a few times before (at this time of writing)... and I tend to forget the ingredients and their general measurements lol :P

I made a few changes to the linked recipe above, I:
  1. used a bit less sugar, because I don't like it too sweet
  2. added chocolate powder, because I just felt like it
  3. used sea salt, because I saw another recipe using it so I'm curious about how it'll turn out
  4. added a bit of milk, because I like the idea :P
  5. used baking powder instead of baking soda (yes, the horror!), because I didn't have baking soda and I'm too lazy to go get some
Anyway, here's tweaked recipe, which roughly makes 5 dozen cookies that are about 2 inches in diameter. :)

Equipment

  1. Oven
  2. Spatula
  3. A large mixing bowl
  4. Baking tray (2 if possible)
  5. Baking/lining paper
  6. Measuring spoon/cups
  7. Airtight container
  8. Dining tray/baking rack/large plate


Ingredients A (wet):
  1. 1¼ C sugar (mixing white sugar and packed brown sugar is better)
  2. 125 g butter, melted
  3. 2 Tbsp cooking oil
  4. 2 large eggs
  5. 1 Tb milk
  6. 5 drops of vanilla essence (you could also try 4:1, vanilla and peppermint)

Ingredients B (dry):
  1. 2¼ C all purpose flour, well-sifted
  2. 1½ tsp baking powder (or 1 tsp baking soda)
  3. 1 Tb cocoa powder
  4. 3/4 tsp salt
  5. 1 C of chocolate chips

Directions:
  1. Preheat oven to 190degC.
  2. With a spatula, mix Ingredients A one by one in a bowl until well-combined.
  3. Stir in Ingredients B one by one, and mix everything well. The dough will become quite firm.
  4. Line the baking tray with baking paper.
  5. Scoop half a tablespoon of dough and use the spatula to push it onto the baking paper
    (arrange each scoop of dough so that there is about 2 inches of space between each cookie to prevent the cookies from melting+combining together).
  6. Place the tray in the oven for about 8-10 minutes
    (8 mins = slightly chewy brown-on-the-edges-lighter-in-the-centre cookies, 10min = darker and crispier; I'd go for 9 mins).
  7. Prepare another batch on a second baking tray
    (keep this and the rest of the dough in the fridge/freezer while waiting for the batch in the oven!) ^*^
  8. After a batch of cookies are done, take it out and replace it with the second tray you have prepared. Transfer the freshly baked cookies onto a clean surface (baking rack, dining tray or large plate) to cool down at room temperature
  9. The cookies are good to eat/store just before the previous batch is done in the oven - transfer the baked cookies into an airtight container as soon as they've cooled down to prevent them from going stale. :)


And that's pretty much it. Now I'll enjoy my cookies with some mint tea. :D

^*^ a cold dough will 'melt' faster, making the cookie melt quicked and make it thinner (and crispier) around the edges. Just the way I like it :D

Saturday, December 31, 2011

No-yeast Homemade Thin-crust Pizza

- zaty.

I was feeling bored so decided to make pizza for dinner. I've made it twice so far, and I think I've somewhat figured out what to (not) do if I wanted to make it again in the future.

I used the no-yeast pizza recipe from here, but because my family likes thin-crust pizza, I had it in the oven for about 15mins at 180degC. Make sure not to knead too much with your hands (the heat of your hands can affect the dough), don't use too much flour (it'll make the bread hard) or use butter to 'coat' the pizza pan/dish to prevent the dough from sticking to it (use a bit of oil and smear evenly... using butter makes the pizza bread too crispy).

Here's the recipe.

Ingredients

  1. 2 cups all-purpose flour
  2. 1 Tbsp baking powder
  3. 1/4 tsp salt
  4. 2/3 cup water
  5. 1 Tbsp cooking oil


Instructions

  1. Preheat oven to 180degC.
  2. Line the pizza pan/dish with baking paper, or smear a thin layer of cooking oil evenly (to prevent the pizza bread from sticking to the pan later).
  3. Mix all dry ingredients in a bowl.
  4. Add the liquids into the bowl, and, using a wooden spoon, combine everything to make a rather solid dough.
  5. Sprinkle some flour on a clean, flat surface, and place the dough on it. 
  6. Knead the dough about 6 times to make sure all the ingredients are evenly combined.
  7. Place the dough on the prepared pan/dish and flatten it to make a nice thin-crust bread (I use a small plastic roller to flatten the dough, super handy).
  8. Once the dough looks good, smear a thin layer of cooking oil on the top surface of the dough (to prevent the tomato sauce base and/or toppings from making the pizza base soggy).
  9. Scoop on and spread the tomato sauce base*** on the dough evenly
  10. Scatter toppings^^^ onto the tomato base, and add herbs if desired (I love using basil, I just sprinkle it all over).
  11. Scatter cheese (sprinkles, shreds, squares, chunks, whatever) to moderately cover the toppings. 
  12. Place the pizza in the oven for about 15mins, until the topping becomes slightly brown. 
  13. After it's done, take it out of the oven and let it cool for a minute or two, then cut into desired way/size. Serve hot :D 

 *** I used a medium-sized can of pasta (tomato) sauce and a small can of tomato puree
^^^ I used chicken sausage cut into really thin slices, a handful of minced beef, crushed garlic, diced onions, diced tomatoes and crushed black pepper. I wish I had capsicum :T

 Will post up pic later Cheerios!

Wednesday, July 20, 2011

Cheese scones (using cheese slices)

- Zaty.

So I've returned to Malaysia and upon my mother's request, I made cheese scones today. She asked me to bake about 20 scones, and since one batch makes about 6 I had to multiply the ingredients by 4 to make 24. I ended up making 25 tho, because I didn't cut up the portions evenly lol.

I generally used the ingredients from the cheese scone recipe I posted before, but I had to improvise a lil bit because I only had cheddar cheese slices instead of a block of edam, which I normally used back in NZ (edam cheese is much more creamy than cheddar). The scones still tasted pretty good tho, so I guess it wasn't a bad substitute. :)

I'm a bit sad that I wasn't equipped with my trusty measuring cups+spoons during the prepping process...I already gave them away because I thought I wouldn't need them. I felt so handicapped because Ma doesn't have the complete cup+spoons sets. :( Sigh.

Anyway, here's what I did, before I get all nostalgic and ramble further:

Prep time: 20-40 minutes
Cook time: 10 minutes
Servings: 6 scones per batch

Ingredients:
  • 1 1/4 C self-raising flour
  • 1/4 tsp salt
  • 1/4 tsp sugar
  • 25g butter, diced
  • Cheese: 
    • for dough: 5 cheese slices, torn into smaller/thinner strips (C-D)
    • for topping: 1 1/2 cheese slices, cut to make 6 squares = 1/4 slice per scone (C-T)
  • Milk:
    • for dough: 1/2 cup (M-D)
    • for coating: 1/4 cup (M-C)
Directions:
  1. Preheat oven to 220 deg C.
  2. In a bowl (stir using wooden spatula - not hands!):
    1. Sift in dry ingredients.
    2. Add diced butter by 'massaging' it in - should look like fine breadcrumbs in the end.
    3. Add cheese for dough (C-D). Mix evenly.
    4. Make a pit in the middle of the mixture, then add milk (M-D) while mixing quickly.
  3. Cover your hands with flour and sprinkle some on the tabletop/board to prevent dough from sticking to it.
  4. Turn out dough and place on the tabletop/board. Knead dough lightly; if it's too sticky, add flour, bit by bit.
  5. Roll out dough on board until about 2cm thick, then cut into 6 equal portions. (I like shaping the portions to make them slightly rounder).
  6. Roll around each scone in milk (M-C), then place each on a greased/lined oven tray. Make sure to leave at least 2cm gaps between them.
  7. Top each scone with 1/4 slice of cheese (C-T)
  8. Bake for about 9-10 minutes, or depending on how brown you want them.
  9. Set aside for about 5 minutes before munching on them :D
My mom says it's the best batch of scones she's ever had in Malaysia. Clearly that's an exaggeration lol, but it's nice watching my family members eat the things I bake.

So... yup! Cheerios and till next time. :)

Friday, March 04, 2011

Super-easy Yoghurt Cake

- Zaty.

Today's baking is a a result of Carlo's story about his friend's mom who makes yoghurt cake (which is apparently one of the best cakes he's eaten), and a M'sian potluck thing (masquerading as a 'natural disaster' meeting). After much debate on what to bake, I surrendered and googled up 'yoghurt cake', and was pleasantly surprised by how easy the recipe seemed. It really is easy to make, just like how this recipe looks - no electric mixers, melting butters, kneading etc. Easy peasy. Just the way I like it. :P

Anyway, I got the recipe from here, but with a simple adjustment - I used the (150g) cup for single-serve yoghurts as the measuring tool. In other words, every ingredient is measured using this cup (aside from the eggs, of course... although 3 eggs do fill up the yoghurt cup nicely). :)

I made 2 cakes: one with raspberry+cream yoghurt, and the other was peach+cream yoghurt.

Will post up more pics later.
~

This recipe makes a medium-sized cake.

Note: cup* = single-serve yoghurt cup

Ingredients 
  • 1 cup* of yoghurt (fruity flavored is yumm)
  • 1 cup* oil (I used my canola cooking oil)
  • 2 cups* white sugar
  • 3 cups* self-raising flour
  • 3 eggs
    Optional: raspberry (or other) jam.
Directions
  1. Preheat oven to 160degC.
  2. In a bowl, beat the ingredients one-by-one with a wooden spatula until smooth and creamy. This might take a few minutes.
  3. Pour smooth mixture into a greased/baking-paper lined pan. 
    • Optional: Scoop some jam and slowly place it at the top of the batter. Use a chopstick or something long to squiggle or swirl the jam to give the cake extra flavour.
  4. Bake for 1 hour or till golden brown (the fork should come out clean when poked).
  5. Give about 10 mins to cool down, then cut and serve.
    • Optional: After the cake has cooled down a bit, turn the cake out of the pan, and let it stand on its side. Cut the cake in the middle lengthways, and place both sides down. Spread some jam onto the 'fluffy' side of both halves, then enjoin the two parts the way it was before -- it should look like a 'jam sandwich' cake in the end.

Result?


Raspberry+cream yoghurt cake (see the swirley bit at the top? Hee ^_^)
Note: This is before I turned it into a sandwich cake.


I have some extra slices left, so I'll post some pics of what it looks like later.

~

It's so easy to make, and it tastes nice if I do say so myself. Do try it! Have fun baking! :)

Thursday, September 23, 2010

Mini Pizza


- Zaty.
Before baking

Ingredients
Essentials:
  • 'Small' breads (preferably pizza bases, but any breads - even pita/normal sliced bread will do)
  • Tomato paste
  • Oregano
  • Salt
  • Sugar
  • Cheese (slices/shreds = awesome). Best to use mozarella, but could use edam or colby.
  • Oil (olive, preferable)
Topping suggestions:
  • Garlic, chopped
  • Mushrooms, small pieces
  • Onion, diced
  • Meat, diced finely (I used sausage bits for this one) - make sure this is pre-cooked!
  • Pineapple, diced
Instructions
  1. Preheat oven. If you'll be making mini pizza using...
    1. Pizza bases, 230 deg C will do. F
    2. For other breads, I'm unsure... maybe 200 degs?
  2. If you'll be using meat, cook it while you're preparing the other stuff.
  3. Add in salt, sugar, oregano and chopped garlic into the tomato paste. Not too much!
  4. Slather the tomato paste mixture onto the breads.
  5. Sprinkle mushrooms, onions and pineapples evenly on the bread. Then add meat. (Make sure to not overcrowd the toppings or they'll fall off!)
  6. Cover #5 with cheese.
  7. Sprinkle breads with some oregano and sugar.
  8. Spread some oil on a baking tray/paper/foil, and place breads carefully onto it.
  9. Put it in the oven for 8-10 mins.
  10. After taking it out, let it stand for a couple of mins, and you're ready to dig in. Should turn out something like this:

After baking

うまえ! ;)

Saturday, September 18, 2010

Coco Choco Slice

- Zaty.


Got the recipe from the back of a tin of Pam's evaporated milk. Seriously.

I think I lost the recipe sheet. Darnit. I'll update this when I find it/buy another tin of evaporated milk. :P

Prep time: 20 mins
For: 1 medium-sized pan

Ingredients

Base


  • 1 1/2 C flour
  • 3 T cocoa
  • 2 t baking powder
  • 3/4 C castor/icing sugar
  • 1/2 C dessicated coconut
  • 175g butter, melted
Topping
  • 1 C icing sugar
  • 2 T cocoa
  • 3 T butter, melted
  • 1 C dessicated coconut
  • 4 T sweetened condensed milk
  • 1 t vanilla essence

Instructions
  1. Preheat oven to 180 deg C, then grease/line a 20cmx30cm slice tin.
  2. Prepare base:
    1. Sift flour, cocoa and baking powder into a bowl.
    2. Stir in sugar and coconut.
    3. Add in butter and mix well, to moist crumbs.
    4. Press the crumb base mixture into the prepared tin using a spatula/wooden spoon.
    5. Bake in a preheated oven for 20mins, then allow to cool.
  3. Prepare topping:
    1. Sift icing sugar and cocoa in a bowl.
    2. Stir in melted butter, coconut, condesned milk and vanilla essence. Mix well.
  4. Spread topping over the base and place in fridge for 2 hours (until firm), then cut the pieces.


It was fun to make! :)

Tuesday, August 17, 2010

Sweet Filo Egg Tarts

- zaty.

So I have tonnes of filo pastry sheets... and they're expiring soon. Like, real soon. I needed something easy to make with them, and I needed it like super fast.

Aaaaand so it happens that I stumbled upon some pics of egg tarts today. Yummy, eggy, 'healthy', sweet, smile-erupting egg tarts. All together now, MMMmmmMmmm. :)

I searched high and low for egg tart recipes that happen to use filo, but alas, none was conjured up by Google. This, of course, calls for an experiment by yours truly! :P

So after compiling a few egg tart recipes to find a reasonable/rational experimental recipe (and taking whatever I have in my cupboard into consideration), here's what I managed to come up with:


Sweet Filo Egg Tarts

Makes 18 tarts (using medium-sized cupcake pans).

Ingredients
  • Filo pastry
  • 220ml hot water
  • 80g white sugar
  • 1/4 tsp salt
  • 3 eggs
  • 80ml milk
  • 1/4 tsp vanilla extract
Instructions
  1. Preheat oven at 180 C
  2. Dissolve sugar & salt in hot water. While waiting to cool, continue with #3
  3. Prepare filo:
    • Cut filo into desirable size and layer about 8 of them in each cupcake hole. 
    • Butter the edges of the stacked pastry to avoid them from getting too flaky.
  4. In a bowl, whisk eggs until thick and creamy, then add milk. Continue to whisk until combined.
  5. Add sugar+salt solution gradually and then some vanilla essence. Continue whisking. It will turn quite runny, that's fine.
  6. Scoop the mixture slowly into the prepared filo pastry.
  7. Bake for 20 minutes or till the edges of the filo is brown and the filling is set.
  8. Let cool before serving.

Results?

sweet filo egg tart - plain
simple and plain

sweet filo egg tart - choc chip
with choc chips
(added last, right before baking)

sweet filo egg tart - choc
with powdery choc drink
(added last before baking)

sweet filo egg tart - crust focus
yup, crispy pastry. :)

Haha they're not the prettiest things in the world, but they taste alright.

Good luck and have fun trying them out!

Sunday, August 15, 2010

Quiche - with filo pastry

- zaty.

Update: salt amount corrected :)

So I made quiche again today. The difference, however, is that I used filo pastry for the first time in my dear life. Considering the fact that I'm making this as a 'more' (shared 'dessert' for after terawih prayers), this is quite a risk.

But then I'm too much of an experimenter to not take the risk. :P

Anyhoo this time around I made both 'mini' (ie. cupcake-sized) quiche and a medium-sized square-pan quiche. I also prepared two batters - one is with meat, and the other is vegetarian. Just cuz I felt like it. The later is only for the mini ones though.

Anyway, onto the recipe!


Inspired by this recipe (uses filo pastry) & the easy quiche #2 recipe --- modified. 


Makes:
  • 3 dozens mini quiches OR 
  • 2 dozens mini quiches + 1 medium-sized square-pan quiche.


Ingredients:
  • filo pastry sheets
  • 6 eggs
  • 3 cups milk ~
  • 5 tbsp melted butter (about 75g)
  • 1 cup self-raising flour
  • 2 cups grated cheese
  • 4 cups of anything you like *
  • 2 large tomatoes, sliced

    Optional: Oregano, thyme, black pepper, salt to taste
    (thanks canadian girl for the tip!)

    ~ for better taste, use 1½ cup cream+1½ cup milk
    * I used:
         Diced = 1 large sausage, 5 button mushrooms, 1 onion, 1 green capsicum
         Sliced finely = 4 spinach leaves


Directions:
  1. Set oven to 175 deg C
  2. Whisk together the first 5 ingredients (eggs, milk, butter, self-raising flour, salt)
  3. Fold in cheese and filling (*)
  4. Prepare filo pastry:
    • For mini quiche:
      • Take one sheet, fold it in half. You can 'glue' the folded parts together using melted butter/cooking spray.
      • Cut filo sheet into 4 strips - each strip about 6cm in width.
      • Fold the strips twice to make an approx 6cm square.
      • Place filo 'squares' in muffin tray hole. 
      • When every container is lined with filo, continue with step #5
    • For square pan:
      • Lay filo sheets one above the other, about 8 sheets
      • Make the sheets look neater by folding them in/cutting them (I didn't do a good job tho :P), then continue with step #5.
  5. Pour the mixture into pan.
  6. Top with sliced tomatoes and sprinkle with herbs.
  7. Bake for about 35 minutes. Wait to cool before serving (about 10 minutes).


PICS!


Before baking:


IMG_1652
meaty mini quiches.
messy, i know. lol.

IMG_1650
meaty square quiche.
i topped this with another sheet of filo, which explains that white-ish surface.
(next time i'll skip that - i prefer the quiche w/o it. haha.)


After baking:

IMG_1666
vegetarian mini quiches
(no sausage, extra veggies+mushroom)

IMG_1662
meaty mini quiches

IMG_1659
meaty square quiche

Bon apetit! :)

Tuesday, August 10, 2010

Cupcakes!

- zaty.

For someone's birthday:


Really easy to make too :D

Here are the recipes for the cupcake (original here) and the icing (original here), in that order:


Needed/recommended tools:
Oven (not microwave), electric beater, cupcake pan, big mixing bowl, measuring spoons/cups.


Easy (vanilla) cupcakes recipe


This simple vanilla cupcake recipe creates a cupcake that is perfect background for your creative decorating ideas.
Ingredients
  • 2 1/4 cups all purpose flour 
  • 1 1/3 cups white sugar
  • 3 teaspoons baking powder
  • 1/2 tsp salt
  • 1/2 cup butter/shortening
  • 1 cup milk
  • 1 tsp vanilla essence (I used 3/4 vanilla, 1/4 peppermint)
  • 2 large eggs
  • Optional: 1 cup of chocolate chips.
Directions
  1. Preheat oven to 175 degrees C and line cupcake pans with paper liners.
  2. Combine: flour, sugar, baking powder, and salt in a large mixing bowl.
  3. Add shortening, milk, and vanilla and beat for 1 minute on medium speed.
  4. Scrape side of bowl with a spatula, add eggs to the mixture and beat for 1 minute on medium speed.
  5. Scrape bowl again and beat on high speed for 1 minute 30 seconds until well mixed. (You may add choc chips and stir it using a spoon after this)
  6. Spoon cupcake batter into paper liners until 1/2 full. (more than this = big cupcake).
  7. Bake for 20 minutes or until toothpick inserted in center comes out clean.
  8. Cool 5 minutes in pans then remove and place on wire racks to cool completely.
  9. Once cupcakes are completely cooled, top with icing (read on).

It's important to make the icing AFTER your cupcakes are done, because if you wait to use the icing, they will harden. And no, heating it up again is  a good idea because it'll melt and turn out very greasy. Really, eww.

The icing is easy to prepare and probably takes about 10 minutes.


Easy buttercream icing recipe
Ingredients
  • 150g butter, softened
  • 250g icing sugar
  • 1 tsp vanilla
  • 2 tsp hot water
  • Food colorings (for the above, I used red and blue liquid coloring)
Directions
  1. Beat together butter and sugar with an electric beater.
  2. Once well combined, add the vanilla and hot water.
  3. Beat again until smooth and creamy. It will be of a light yellow shade, like creamy butter.
  4. Decide how many colors you want and separate this concoction into that number of colors. Then add coloring as needed, little by little.


Note: For the above cupcakes, I used 4 'batches' of colors for the icing:
- yellow (uncolored - as seen as the 'yellow flowers' bordering the cakes),
- hot pink (a few drops of red),
- turquoise (a few drops of blue),
- purple (two shades - one for the base and a darker one for the writing. red+blue)


For the writing, I used combined the leftover icing and added a bit more coloring. I also cheated and used an icing squeeze gel pen I bought sometime ago :P

extra cupcakes
The cupcakes that didn't make the cut, topped with all the extra icing and some sprinkles :P


(You can tell I was messing around with everything, eh? Haha)

Have fun! :)

Friday, August 06, 2010

Cheese scones

- zaty

Today Carlo and I made two batches of scones - one is plain cheese scone, the other is savoury (we added bits of half a sausage). We made 2 dozens for the first batch but it didn't turn out very well because we forgot the baking powder... which led to us making the second batch, the savoury one.

Most ppl who've tried this prefer the savoury one - I like the plain ol' cheese scone more. :P it tastes great with fruit jam!

scone attempt #1 - unrised!
FAIL Batch #1 - bakingpowderlessness = unrisen dough

2nd batch of scones - after, closeup
Batch #2 - looks much better, don't it? :D

Also, in case you were wondering, we used Edam cheese, which is quite yummy. Cheddar might work too.


Update (22/05/11): use self-raising flour instead of flour+baking powder

This original recipe is from here. :)

Prep time: 20-40 minutes
Cook time: 10 minutes
Servings: 6 scones

Ingredients:
  • 1 1/4 C self-raising flour
  • 1 1/4 cup flour
  • 3 tsp baking powder
  • 1/4 tsp salt
  • 1/4 tsp sugar
  • 25g butter, diced
  • 1/2 cup milk for dough (MD)
  • 1/4 cup milk for coating (MC)
  • 1/2 cup grated cheese for dough (CD) - the more, the cheesier! :)
  • 1/4 cup grated cheese for topping (CT)
  • Optional: 
    • Rubbed oregano (for the lovely smell)
    • 1/2 finely diced onions
    • 1/2 chopped sausage
Directions:
  1. Preheat oven to 220 deg C.
  2. In a bowl (stir using wooden spatula - not hands!):
    1. Sift in dry ingredients.
    2. Add diced butter by 'massaging' it in - should look like breadcrumbs at the end.
    3. Add cheese for dough (CD) (and onion/sausage bits if you want savoury scones). Mix evenly.
    4. Make a pit in the middle of the mixture, then add milk (MD) while mixing quickly.
  3. Cover your hands with flour and sprinkle some on the tabletop/board to prevent dough from sticking to it.
  4. Turn out dough and place on the tabletop/board. Knead dough lightly; if it's too sticky, add flour, bit by bit.
  5. Roll out dough on board until about 2cm thick, then cut into 6 equal portions. (I like shaping the portions to make them slightly rounder).
  6. Dunk each scone in milk (MC), then place each on a greased/lined oven tray. Make sure to leave at least 2cm gaps between them.
  7. Top each scone with grated cheese (CT). (I like to sprinkle a bit of oregano as well).
  8. Bake for 9-11 minutes, depending on how brown you want them.
Enjoy! :D

scone baby tucked in
Baby scone tucked in ( - Carlo's idea!) :P

last updated 05122010

Thursday, July 23, 2009

Choc cake in a mug

- zaty.

Update 11/5/2014: here's an updated version of the recipe: clickie!

Yes, in a mug. I kid you not.

microwave chocolate mug cake attempt #1 (before)
Pre-microwave

microwave chocolate mug cake attempt #2 (after)
Post-microwave

Not exactly the prettiest cake in the world, but honestly - if you have 10 minutes, a microwave oven, and a dire craving for a choc cake fix pronto, this is much easier than walking all the way to the bakery or even baking a 'real' cake.

Original recipe from here.

Microwave choc cake in a mug recipe:
Tools
  • Microwave & coffee mug. Also baking paper to line the mug :)
Ingredients
  • 4 tbsp flour
  • 4 tbsp sugar
  • 2 tbsp unsweetened cocoa
  • 2 tbsp whisked egg (omit this for a fudgier cake)
  • 3 tbsp milk
  • 3 tbsp oil
  • 3 tbsp choc chips
  • A few tsps of of flavoring - eg. vanilla, peppermint
Directions
  1. Add all of the dry ingredients (flour, sugar, cocoa) to the mug and mix.
  2. Add the egg and combine well. It gets pretty pasty at this point.
  3. Stir in milk and oil.
  4. Add choc chips and flavoring. Stir well.
  5. Microwave for 3 minutes in a 1000w oven, or 4 minutes in a 700w oven. It will start to crown over the top of the mug. Don't panic! It will collapse once the heat stops.

Enjoy :)

Saturday, September 22, 2007

For Cookie Lovers, this is for free~

- Odie.

*got this email from a friend of mine, and i thought that it's kinda relevent to post it here. On the second thought, i find this email s very interesting. It's about the famous amos cookies. famous amos cookies as biskut raya, anyone? hehehe.. (note: i havent tried baking it. so please dont blame me if it doesn't taste anything like the famous amos one =p) *

Photo Sharing and Video Hosting at Photobucket
This is a true story

My daughter and I had just finished a muffin at Famous Amos Caf in Bangsar & decided to have some cookies. Because both of us are such a cookie lovers, we decided to try the "Hawaiian Nut Cookie".

It was so excellent that I asked if they would give me the recipe and the waitress said with a small frown "I'm afraid cannot". Well I said, "Would you let me buy the recipe?"

With a cute smile, she said "YES". I asked how much and she responded, "only two fifty, it's a great deal!" I said with approval, "Just add it to my bill"

Thirty days later, I received my VISA statement from Famous Amos and it was RM285.00. I looked again and remembered I had only spent RM9.95 for two muffins and about RM20.00 for a pie. As I glanced at the bottom of the statement, it said, "cookie recipe - RM250.00". That's outrages!!!

I called the Famous Amos's Accounting Dept. and told them that the waitress said it was "two-fifty", which clearly does not mean "two hundred and fifty dollars" by any POSSIBLE interpretation of the phrase. Famous Amos refused to budge.. They would not refund my money, because according to them, "What the waitress told you is not our problem. You have already seen the recipe - we absolutely will not refund your money at this point."

I explain to her the criminal statues which govern fraud in Malaysia. I threatened to refer them to police for engaging in fraud. I was basically told, "Do what you want, we don't care, and we're not refunding your money." I waited for a moment, thinking of how I could get even, or even try to get any of my money back. I just said, "Okay, you people got my RM2-50.00, and now I'm going to have a RM250.00 worth of fun." I told her that I was going to see to it that every cookie lover in Malaysia with an email account has a RM250.00 cookie recipe from Famous Amos...for free... She replied, "I wish you wouldn't do this" I said, "Well you should have thought of that before you stole from me", and slammed down the phone on her.

So, here it is!!! Please, please please pass it on to everyone you can possibly think of. I paid RM250.00 dollars for this...I don't want Famous Amos to ever get another cent off of this recipe..... Recipe may be halved:

Ingredients
2 cups butter
4 cups flour
2 tsp. baking soda
2 cups granulated sugar
2 cups brown sugar
5 cups blended oatmeal (measure oatmeal & blend in blender to a fine powder)
24 oz. chocolate chips
1 tsp. salt
18 oz. Cadbury bar (grated)
4 eggs
2 tsp. baking powder
3 cups chopped nuts (your choice)
2 tsp. vanilla

Steps
- Cream the butter and both sugars.
- Add eggs and vanilla; mix together with flour, oatmeal, salt, baking powder, & soda.
- Add chocolate chips, Cadbury bar and nuts.
- Roll into balls and place two inches apart on a cookie sheet.
- Bake for 10 minutes at 375 degrees.
- Makes 122 cookies.

Have fun..!!