Showing posts with label tomatoes. Show all posts

Thursday, June 12, 2014

Filosirapture (vegetarian filo wraps)

so today i decided to play with filo because i haven't done any baking in a while.

first things first - what do i have in the pantry/fridge?

scanned and spotted:
a few just-ripe avocado, coconut oil, soy milk, cheese, choc chips, cherry tomatoes, fried garlic, mushroom stock, spices+herbs.
(there were other things obviously, but i decided not to use them because they would require defrosting etc.)

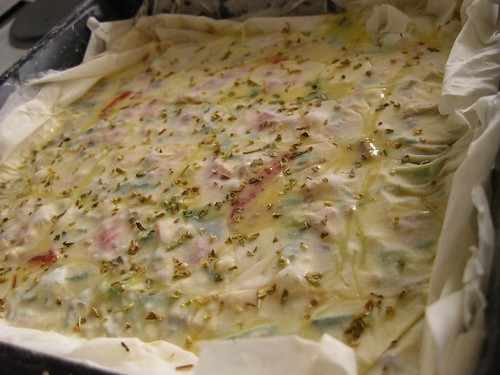
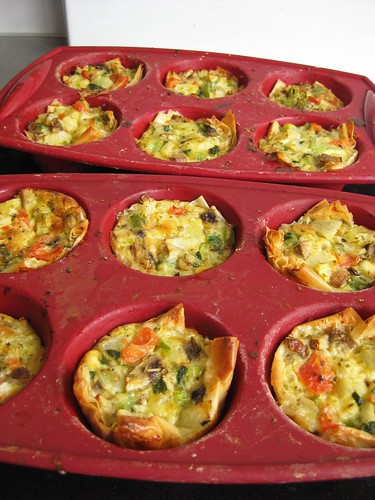
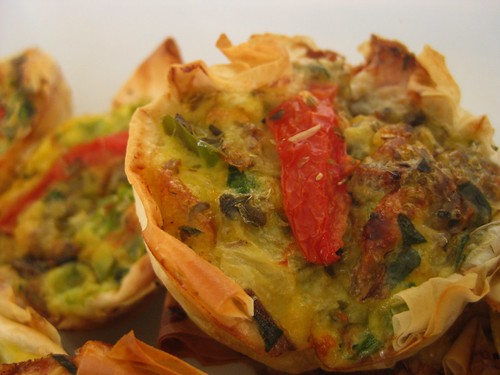
so i decided to make (various kinds of) avocado filo wraps. using filo straight from the freezer*. i made different batches - about 3 wraps per combo, eg. avocado+cheese, avocado+choc chips.
preparation time for ingredients: + 5 mins?
cooking time: at Gas 6, in the oven for 12 mins per batch
overall, it took me about an hour to prepare the things for and make these:

defo not the prettiest dish in the world, lol.
also - sweet sour chilli sauce ftw!

i'm not even going to try to explain how i made this hahaha. it's not a horrible experiment (by my standards), but i know i can do better if i was more prepared and didn't feel too rushed (people were coming over so i didn't want them to witness my potential culinary disaster lol).

i'll defo try this again in the near future, but with a few things in mind:
  1. * don't use filo straight from the freezer. leave it in the fridge for a few hours to soften it a bit or else it'll get brittle and too flaky. not fun to clean up later.
  2. if you want to use milk to 'moisten' the filo up a bit, leave it to the stage just right before it's going to be chucked into the oven.
  3. filo is terribly plain, and so is avocado. definitely need to spice/herb it up a bit, or else you'll have to eat it with some kind of sauce at the end (which isn't too bad tbh, i eat my savory ones with sweet sour chilli sauce :D).
  4. use fresh garlic next time
  5. possible different ingredients to try in the future: mushrooms, capsicum, onions, leek, tuna, mince, tomato paste, oregano, chilli, oatmeal
  6. what i found were good combos in filo
    1. avocado+cheese+cumin
    2. avocado+cheese+tomato
    3. avocado+choc chips+soy milk+cinnamon powder
... yeah.

Sunday, March 13, 2011

Honey Tomato Chicken

- Zaty.

I'm just so sick of my own cooking (and I'm sure Mr. M feels the same way) so yesterday I tried to make a modified version of "ayam masak merah" (ie. tomato chicken). This was inspired by this recipe; I adapted it to suit what I had around the house (I didn't have tomatoes and ginger, most importantly).

The taste was bit different from what I expected, I'm guessing 1/2 can of tomato puree was too much, so next time I use this recipe I'll use only a 1/3 or less. I had to add in a bit of boiling hot water to make the gravy less thick, and added in honey and soy sauce for extra flavor.

Anyway, here's the (fixed) version of what I made yesterday:

Ingredients (for 2 people)
  • Group A - to 3/4 fry:
    • 4 pieces of chicken nibbles
    • turmeric powder
  • Group B - to blend:
    • 2 shallots
    • 3 Tbsp dried chilli blend
    • 1cm ginger (I was out of this so I used galanghal, but next time I'll make sure to use ginger)
    • 3 pcs garlic
    • 1 medium onion
  • Group C - other stuff:
    • 1/3 tin tomato puree
    • 1 large Tbsp-full of honey
    • 2 T soy sauce
    • 1/2 tin of button mushrooms, sliced
    • 1 small onion, cut into rings
    • 1 cup frozen vege (peas, carrots, corn).
    • sugar
    • salt Optional: 1 cup boiled water
  • Optional: 1 cup boiled water

Instructions
  1. Clean and prepare chicken as appropriate (small pieces is easiest and fastest to cook). Toss the chicken pieces in a bowl and cover them completely with turmeric powder.
  2. Heat up some oil in a pot, and fry turmeric-covered chicken until about 3/4 done. While waiting for this, blend everything in Group B - it doesn't have to be finely blended.
  3. Take chicken pieces out and sautee the blended Group B ingredients till a fragrant smell rises.
  4. Add in tomato puree, mixing well. Wait for a few minutes so that everything heats up well and the paste produces some oil (ie. until 'pecah minyak').
  5. Add in soy sauce and honey as desired.
  6. Add in sliced mushrooms, stir for a few minutes.
  7. Place the previous chicken pieces back into the pot, stir well. 
  8. Wait for the gravy to thicken, stirring the pot content every half a minute. Continue until sure that meat is cooked.
  9. When gravy has thickened (might take about 10 mins), add in sugar, salt, peas etc. Wait for a few minutes, stirring constantly. 
  10. When done, serve with rice (preferably tomato rice, but I ate it with plain rice).

Result

Will update with picture when my internet's not being annoying. :P

Have a nice day!

Thursday, September 23, 2010

Mini Pizza


- Zaty.
Before baking

Ingredients
Essentials:
  • 'Small' breads (preferably pizza bases, but any breads - even pita/normal sliced bread will do)
  • Tomato paste
  • Oregano
  • Salt
  • Sugar
  • Cheese (slices/shreds = awesome). Best to use mozarella, but could use edam or colby.
  • Oil (olive, preferable)
Topping suggestions:
  • Garlic, chopped
  • Mushrooms, small pieces
  • Onion, diced
  • Meat, diced finely (I used sausage bits for this one) - make sure this is pre-cooked!
  • Pineapple, diced
Instructions
  1. Preheat oven. If you'll be making mini pizza using...
    1. Pizza bases, 230 deg C will do. F
    2. For other breads, I'm unsure... maybe 200 degs?
  2. If you'll be using meat, cook it while you're preparing the other stuff.
  3. Add in salt, sugar, oregano and chopped garlic into the tomato paste. Not too much!
  4. Slather the tomato paste mixture onto the breads.
  5. Sprinkle mushrooms, onions and pineapples evenly on the bread. Then add meat. (Make sure to not overcrowd the toppings or they'll fall off!)
  6. Cover #5 with cheese.
  7. Sprinkle breads with some oregano and sugar.
  8. Spread some oil on a baking tray/paper/foil, and place breads carefully onto it.
  9. Put it in the oven for 8-10 mins.
  10. After taking it out, let it stand for a couple of mins, and you're ready to dig in. Should turn out something like this:

After baking

γ†γΎγˆ! ;)

Sunday, August 15, 2010

Quiche - with filo pastry

- zaty.

Update: salt amount corrected :)

So I made quiche again today. The difference, however, is that I used filo pastry for the first time in my dear life. Considering the fact that I'm making this as a 'more' (shared 'dessert' for after terawih prayers), this is quite a risk.

But then I'm too much of an experimenter to not take the risk. :P

Anyhoo this time around I made both 'mini' (ie. cupcake-sized) quiche and a medium-sized square-pan quiche. I also prepared two batters - one is with meat, and the other is vegetarian. Just cuz I felt like it. The later is only for the mini ones though.

Anyway, onto the recipe!


Inspired by this recipe (uses filo pastry) & the easy quiche #2 recipe --- modified. 


Makes:
  • 3 dozens mini quiches OR 
  • 2 dozens mini quiches + 1 medium-sized square-pan quiche.


Ingredients:
  • filo pastry sheets
  • 6 eggs
  • 3 cups milk ~
  • 5 tbsp melted butter (about 75g)
  • 1 cup self-raising flour
  • 2 cups grated cheese
  • 4 cups of anything you like *
  • 2 large tomatoes, sliced

    Optional: Oregano, thyme, black pepper, salt to taste
    (thanks canadian girl for the tip!)

    ~ for better taste, use 1½ cup cream+1½ cup milk
    * I used:
         Diced = 1 large sausage, 5 button mushrooms, 1 onion, 1 green capsicum
         Sliced finely = 4 spinach leaves


Directions:
  1. Set oven to 175 deg C
  2. Whisk together the first 5 ingredients (eggs, milk, butter, self-raising flour, salt)
  3. Fold in cheese and filling (*)
  4. Prepare filo pastry:
    • For mini quiche:
      • Take one sheet, fold it in half. You can 'glue' the folded parts together using melted butter/cooking spray.
      • Cut filo sheet into 4 strips - each strip about 6cm in width.
      • Fold the strips twice to make an approx 6cm square.
      • Place filo 'squares' in muffin tray hole. 
      • When every container is lined with filo, continue with step #5
    • For square pan:
      • Lay filo sheets one above the other, about 8 sheets
      • Make the sheets look neater by folding them in/cutting them (I didn't do a good job tho :P), then continue with step #5.
  5. Pour the mixture into pan.
  6. Top with sliced tomatoes and sprinkle with herbs.
  7. Bake for about 35 minutes. Wait to cool before serving (about 10 minutes).


PICS!


Before baking:


IMG_1652
meaty mini quiches.
messy, i know. lol.

IMG_1650
meaty square quiche.
i topped this with another sheet of filo, which explains that white-ish surface.
(next time i'll skip that - i prefer the quiche w/o it. haha.)


After baking:

IMG_1666
vegetarian mini quiches
(no sausage, extra veggies+mushroom)

IMG_1662
meaty mini quiches

IMG_1659
meaty square quiche

Bon apetit! :)